Craftable Maw Mount
Ve’nari sells two new items, one of them being the Stygia Dowser for 1500 Stygia.
The Stygia Dowser is an item that stays in your bags and allows you to search for Stygia Nexuses.
Stygia Nexus are small balls of green energy, reminiscent of engineering motes from past expansions.
Stygia Nexuses are usually in areas that are hard to reach, such as behind hordes of mobs, deep inside caves, or in areas only reached via grappling with the Animated Levitating Chain Ve’nari upgrade.
This item will only show up if you’re Appreciated by Ve’nari.
The Stygia Dowser allows you to track Stygia Nexus on the minimap, and when used nearby a Nexus, it will drain it, granting you a small amount of Stygia, as well as some Stygia Dust and Stygia Sliver.
The first step of the secret requires completing a special puzzle located within Domination Keep (located deep within Perdition Hold) and collecting pages of a book.
The puzzle is located on a platform area near the platform that leads to the Soulsteel Forge, is accessible by grappling, and will be signaled on your minimap.
The area has a green fog covering the platform, and when you arrive there, you will get an extra action button to use your Stygia Dowser.
The grappling location can be found at 23.0 68.4 and the Stygia Delirium platform is located at 24.0 75.5.
Once you use your Stygia Dowser, you will be phased out and become a ghost, and a chest with 6 glowing runes will appear at the center of the platform.
You can click on 2 of the glowing runes at a time to swap their positions around.
To solve this puzzle, you need to pay attention to your surroundings – There are 6 spikes on the platform you’re on, and each spike will have a glowing rune on top of them.
You need to order the runes near the chest to match the order of the spikes on the platform.
Be careful, as you DO have limited attempts, and if you fail enough times, you will not be able to attempt the puzzle again for TWO HOURS.
Once you match the runes with the pillars, the chest will open, giving you the Crumbling Stele.
Once you obtain the Crumbling Stele, Ve’nari will have another item for sale – The Partial Rune Codex, for another 2000 Stygia.
Once you read the Partial Rune Codex, you will notice there are pages missing:
<Examining this codex reveals many pages are missing or torn. Of the pages intact, several runes inscribed upon the Stele are represented.
It seems three of the pages needed to understand the Shadehound diagram are missing.
Perhaps finding the pages would allow you to translate and perform the ritual.>
The missing pages of the Rune Codex can be found in different places scattered through The Maw:
Rune Codex Page: Forging can be found at the back of Death’s Howl, one of the many caverns in the southern portion of the Beastwarrens.
Night Fae Covenant members will recognize this cave as the place where they went to save Rezan from The Maw.
Death’s Howl Cave Entrance: 48.8 84.7
Rune Codex Page: Souls can be found in Perdition Hold, on the platform where the rare Thanassos spawns.
Page coordinates: 27.2 72.3
Rune Codex Page: Binding can be found at the upper level of the Tremaculum, behind the location where Anduin was kept prisoner during the Maw introduction.
Page coordinates: 24.6 12.6
Once all three pages are found and added to the Partial Rune Codex, it will transform into the Intact Rune Codex, giving you a walkthrough of the rest of the steps you need!
The Crumbling Stele will also be updated to give you a series of runes.
It is currently unknown if each player gets a different set of runes, or if its the same for everyone.
From the Intact Rune Codex:
From the Crumbling Stele:
The first two portions of the puzzle can be worked at the same time, but the results of both portions need to be obtained to unlock the third and final step.
Stygia Crafting and Armored Husk
For this first portion of the secret, you need to find the Soulsteel Anvil that allows you to convert Stygia Dust and Stygia Sliver into Stygia Bar.
This area is located at the deepest portion of Domination Keep, and it is accessible via grappling with a grappling point path that starts in Domination Keep.
The Domination Keep grapple is located at 23.0 68.4 and once climbed to the highest platform, the Soulsteel Anvil is at 20.2 67.0.
The Soulsteel Anvil in the area is interactable, and when opened, allows access to a special crafting menu, called Stygia Crafting.
Within this Anvil, you can currently craft two items:
Stygia Bar – Requires 10 Stygia Dust and 10 Stygia Sliver.
Armored Husk – Requires 1 Soulforger’s Tools and 20 Stygia Bar.
You will need a total of 200 Stygia Dust and 200 Stygia Sliver to craft the Armored Husk.
The Soulforger’s Tools drop from the Maw rare Soulforger Rhovus, after you fully translate the Rune Codex.
The Stray Soul
The second portion of the puzzle involves us getting a stray soul from “the flow of the river”.
This is a fairly obvious clue – Roaming around Gorgoa, the River of Souls, you can find a Stray Soul.
This wolf soul will follow the flow of the river and despawn on the northern end, respawning at the southern end shortly after and beginning his path over again.
To obtain his item, simply find, approach the wolf and interact with it.
The wolf will enter your Soulkeeper and grant you a Willing Wolf Soul!
The Binding Ritual
Once you have both the Armored Husk and the Willing Wolf Soul, you can go to the last portion of this secret.
The Binding Altar used in the process of binding the wolf soul to the armored husk can be found in the Mawsworn area just south of Ve’nari’s Refuge. Just approach the altar and click on it to bind them and create the Feral Shadehound!
The Binding Altar is at 45.1 48.3.
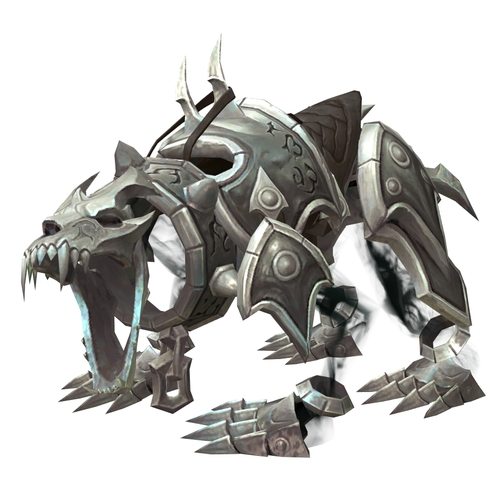
The Feral Shadehound will start the quest Feral Shadehound, where you are required to summon your Feral Shadehound, mount on it and bind it to you!
Once you use the provided item, you will mount on the Feral Shadehound (it will start running wildly across The Maw, so use it in a safe place), and a vehicle bar will appear with four runes – The same four runes shown in the completed Crumbling Stele.
Click on the runes on the order provided by the Crumbling Stele and you will bind the mount to you, completing the quest and granting you the Bound Shadehound mount!